-
 8100 Hits
-
 83.54% Score
-
 17 Votes
|
|
Mountain/Rock |
|---|---|
|
|
38.88060°N / 110.76802°W |
|
|
Scrambling |
|
|
Spring, Fall, Winter |
|
|
7360 ft / 2243 m |
|
|
Overview


This page was accidentally deleted but has been restored. At the time of deletion, the only log entry was mine, and there was reason to believe my climb was the first. If, however, you have climbed this peak either before I did or after, please sign the log and add any information you wish in the Additions and Corrections section.
Full of obscure sandstone wonders, many of which have never been climbed, Utah's San Rafael Swell is a desert wilderness every bit as scenic as the famous national parks of southern Utah, but it is far less popular than they are. Aside from I-70, which effectively divides the Swell into northern and southern sections, there is very little paved access to the Swell, and although there are some trunk roads suitable for most passenger vehicles, there are miles and miles of roads that should only be undertaken with high clearance and four-wheel drive.
People speeding past on the interstate have no idea of the wonders on and around one Locomotive Point. Be one of the few people that do. And if you do go for the summit, take some time to try to locate the small arch in the northwestern section; it is located close to a prominent "balanced rock." If I am indeed the first ever to climb this peak and see this arch, then you may well be only the second. There is another small arch that can be found on the way east to the two summit blocks.
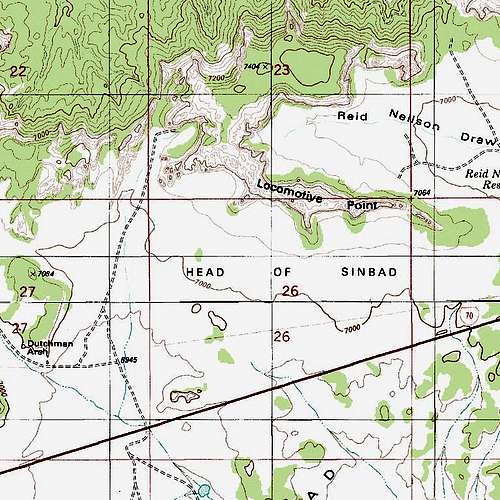
The map below shows the area. Although the roads depicted do exist, the Trails Illustrated map for the San Rafael Swell shows more roads, and I recommend using that rather than the older USGS maps for travel in the Swell.
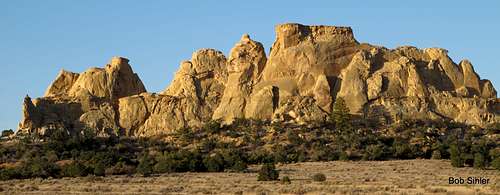
![Locomotive Point and Dutchman Arch]()
![Second Highpoint]()
Located in a section of the Swell called the Head of Sinbad, Locomotive Point is only about a mile from I-70, and the highway is rarely out of sight or hearing while one is approaching and climbing the peak, yet there is still a great sense of isolation out here. For one, although there are roads accessing the base of the formation, they are 4wd roads that depart the main roads several miles away. It does not take long to make a cross-country approach from the interstate, but I am not sure of the legality of parking along the shoulder of I-70. Even though I have done so a few times to climb peaks in the Swell and have not had any trouble, I still do not know if it is technically legal to park and leave your vehicle off the interstate anywhere but designated parking areas. Another reason the peak has an isolated feel is that the cliffs surrounding it on all sides make the summit area look unreachable short of technical climbing that might require aid techniques as well.
In fact, I have reason to believe that my climb of the peak on October 9, 2012 might have been the first ascent of this peak. It at least appears to be the first recorded ascent to be found on the Internet. The way I found up the peak was a bit obscure and complicated, and it would turn back almost anyone not already intent on finding a way up this peak (in other words, the casual hiker out here who is doing a little exploring while camping is not likely to find the way up). Furthermore, I believe the way I found up is the only feasible way that isn't technical. Finally, after leaving the dirt road that accesses the peak, I did not see another sign of past human presence. Usually one can count on finding a cairn here and there, especially at the summit, some disturbed cryptobiotic crust, a wrapper, a bottlecap, etc. But I saw nothing.
So I will not assert beyond dispute that I was the first to climb this peak, especially when it is so close to a highway, but the obscure nature of the peak plus the fact that most who see it are speeding by at 70 mph does make it more than plausible that I might have been the first.
Where and what Locomotive Point exactly is is another question. On topo maps, Locomotive Point is a long east-west ridge guarded by cliffs. No particular spot is indicated as the summit, and the name stretches along most of the formation. These factors seemingly indicate that the entire formation is Locomotive Point, but there is one particular formation, at the eastern end of the ridge, that does, from both east and west, resemble a locomotive. That formation, I suspect, is the actual Locomotive Point, though the name could still refer to the entire massif in the sense that the locomotive-like feature, being at one end, is "pulling" the rest of the "train."
![Locomotive Point from the East]() The "Locomotive" from the east
The "Locomotive" from the east
![Locomotive Point from the West]() From the West
From the West
Ascending the formation that resembles a locomotive looks like a challenging Class 5 matter; fortunately, reaching the highpoint of the entire formation the maps suggest is Locomotive Point is easier, though not easy.
 The "Locomotive" from the east
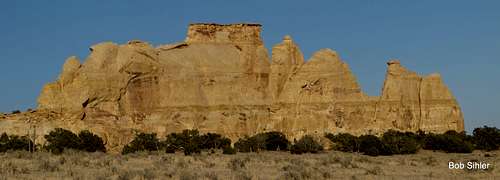 From the West
Ascending the formation that resembles a locomotive looks like a challenging Class 5 matter; fortunately, reaching the highpoint of the entire formation the maps suggest is Locomotive Point is easier, though not easy.
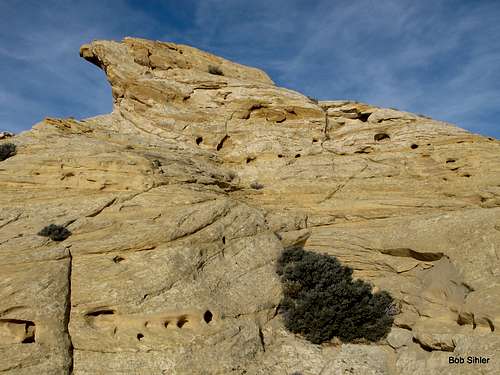
Atop the formation, there are numerous interesting outcrops that are anything from a walk-up to an exposed scramble to climb, but two in particular vie for the honor of being the highpoint. One of them is just a Class 2+ clamber; the other is an exposed low-Class-5 scramble on questionable rock with a hairy approach to the base depending on which side you approach it from. That second, more difficult one does seem to be slightly higher, but I say this by visual comparison only after having ascended both. Regardless, they are very close in elevation.
Although I do not have GPS coordinates for these two outcrops, there is a picture of each on this page in the Route section, and there are additional details in that section as well.
Even if you are not planning on seeking the highpoint due to disinterest in the route-finding or the exposed highpoint or due to some other factor, the environs of Locomotive Point are still worth a visit--
- A little to the west is Dutchman Arch, an interesting feature even though it has been marred somewhat by graffiti.
![Dutchman Arch]()
- Even better are two pictograph panels located on the south side of the formation. Known as the Head of Sinbad Panel, this "gallery" displays some outstanding examples of Barrier Culture art, and no one knows exactly what all the figures represent. The western panel is the better one, with two distinct groups of figures. The eastern panel, unfortunately, has suffered damage, not from humans but rather from a collapse of a piece of the cliff. The top half of the panel is gone.
![Head of Sinbad Pictograph Panel]()
![Head of Sinbad Pictograph Panel]()
![Broken Pictograph Panel]()
- Finally, just to the west of Locomotive Point and the dirt road leading up below the west side of the formation is another series of cliffs and outcrops. There is a whole lot of Class 3-5 stuff there that provides all sorts of fun, and there are some very small arches to discover and admire.


 |
 |
 |
 |
 |
People speeding past on the interstate have no idea of the wonders on and around one Locomotive Point. Be one of the few people that do. And if you do go for the summit, take some time to try to locate the small arch in the northwestern section; it is located close to a prominent "balanced rock." If I am indeed the first ever to climb this peak and see this arch, then you may well be only the second. There is another small arch that can be found on the way east to the two summit blocks.
 |
 |
The map below shows the area. Although the roads depicted do exist, the Trails Illustrated map for the San Rafael Swell shows more roads, and I recommend using that rather than the older USGS maps for travel in the Swell.
Getting There
If you're going to take your chances with the legality of parking along the shoulder of the interstate, then getting to this peak is very easy, and while I recommend parking off the westbound lanes rather than the eastbound ones so that you do not have to cross the highway on foot, you can still get there from the interstate no matter which direction you are traveling.Simply park between mileposts 124 and 125 where there is a 4wd underpass; for further reference, know that this spot is between Ghost Rock and Exit 131. Carefully climb the fence (it is not separating private property from public) and follow the sandy road system to Locomotive Point, which is only about a mile away.
If you don't want to take your chances with the legality of parking off the interstate or know for a fact that it is illegal, then you need to use the following directions instead. Be aware that you will need high clearance and that 4wd is a good idea as well unless you plan to park and walk when road conditions deteriorate. Avoid these roads in wet conditions; the high-clearance and 4wd ones will turn into gooey mud that may cause any vehicle to get stuck.
Get off I-70 at Exit 131 and drive west on a good gravel road for almost 3.5 miles. Then turn right onto a narrower, sandy road and follow it 2.4 miles northwest to an underpass of the interstate. The rocks on either side of the underpass (they seem to have been placed there by people) represent the roughest part of the drive, but any high-clearance vehicle should have no trouble. Continue northwest for 1.2 mi to Reid Neilson Reservoir and a junction. Go left at this junction. After a mile, you pass a spur. Keep going straight (the spur leads to one of the pictograph panels). 0.3 mi later is another spur; this one leads to the main pictograph panel and connects with other spurs that eventually lead around the west side of Locomotive Point, which is where you want to go. Be warned, though, that this second spur becomes very badly rutted and eroded before it reaches the panel, and I felt that there was a good chance a stock vehicle would get damaged or stuck. So instead of taking that second spur, continue straight for 0.7 mi, actually going away from Locomotive Point, and then turn right and head north along a spur that ends in 0.8 mi at the northwestern corner of Locomotive Point. Drive as far as you feel comfortable going and then park without blocking the road.
Alternate route from Exit 131: You can turn right at the second junction after leaving the interstate instead and end up using the underpass mentioned as a locator for those approaching from I-70, but this way is rougher and a bit longer. It makes sense to use, however, if you are also planning to see the Lone Warrior pictograph that is nearby (worth seeing, and in a highly scenic spot for camping, picnicking, or just lounging around).
Route
It may diminish the value of this page to some, but I am only going to provide sparse route details. Because this peak had seen little or no human traffic before my climb, I want to do as much as I can to preserve the sense of route-finding adventure I enjoyed here, and I do not want to encourage casual peakbaggers and list-chasers to trample this peak, stomping on the fragile crust and building cairns all over the place in the process.So here are the route details:
Follow the sandy road that parallels the west side of the peak. Find a gully system that climbs close to the summit plateau above; sometimes it is easier to stay in the gully and sometimes it is better to skirt the sides above it, but if you are on anything harder than Class 4 terrain, look for something easier close by.
Then route-find your way further east and then north to easier ground. This will involve a short downclimb to a moderately exposed shelf and then a re-climb. The way I found seemed to be the only feasible one not involving Class 5 climbing and terrible exposure. The pictures below are in sequence, but the captions and directions are only minimally detailed as part of my attempt to preserve the wilderness and adventure quality of this climb.
Once on that easier ground, work east for about 1.5 miles until you get to the vicinity of the summit blocks, which are about 10-15 minutes apart from each other. Along the way there are pinnacles and outcrops galore; enjoy! The route-finding is mostly intuitive, but some trial-and-error may occasionally be necessary, and be expecting Class 3 conditions and some exposed ledge systems.
The summit block that I think is slightly higher is pictured below. Approaching it from the west side, traversing its base on the south side, is easier and less exposed than approaching from the east side, where it is Class 4 to get to the base of the summit "pitch" but highly exposed; a fall might not be fatal but would probably land one in a drainage that would be difficult or impossible to climb out of or down from without protective gear, making being stranded highly likely.
![Summit Block]()
Once at the base of the summit pitch, maybe 10-12 feet of climbing is left. It is Class 4-5.2 (I lean toward the latter) up questionably solid sandstone. The holds are all there (or were-- sandstone conditions can change almost overnight), but it is exposed (a fall would probably be fatal because the ledge that is the starting point of the pitch is probably too narrow to be relied upon to catch and stop a falling climber) and the rock feels quite fragile. It took me a little while and a few tries to muster the nerve to expose myself as necessary to complete the pitch.
Once on that easier ground, work east for about 1.5 miles until you get to the vicinity of the summit blocks, which are about 10-15 minutes apart from each other. Along the way there are pinnacles and outcrops galore; enjoy! The route-finding is mostly intuitive, but some trial-and-error may occasionally be necessary, and be expecting Class 3 conditions and some exposed ledge systems.


 |
 |
 |
 |
 |
 |
 |
 |
 |
The summit block that I think is slightly higher is pictured below. Approaching it from the west side, traversing its base on the south side, is easier and less exposed than approaching from the east side, where it is Class 4 to get to the base of the summit "pitch" but highly exposed; a fall might not be fatal but would probably land one in a drainage that would be difficult or impossible to climb out of or down from without protective gear, making being stranded highly likely.

Once at the base of the summit pitch, maybe 10-12 feet of climbing is left. It is Class 4-5.2 (I lean toward the latter) up questionably solid sandstone. The holds are all there (or were-- sandstone conditions can change almost overnight), but it is exposed (a fall would probably be fatal because the ledge that is the starting point of the pitch is probably too narrow to be relied upon to catch and stop a falling climber) and the rock feels quite fragile. It took me a little while and a few tries to muster the nerve to expose myself as necessary to complete the pitch.
There was no cairn up there, but there was plenty of birdshit.
The other viable contender for the honor of being the true summit block is about 5-10 minutes further east. It is just a Class 2+ matter to get up it, and it is pictured below. Note, however, that the view is from the east side and is not the view you will see as you approach it.