The Dream
This 16 day trip would be the culmination of two and a half years of traveling the West. I’d read a lot about classic Sierra scrambles/climbs like Cathedral Peak, Mt. Conness, the Palisades, and the Minarets. Throw in the highest peak in the lower 48, some hot springs, Devil’s Postpile, and climbing at Red Rocks and I was hooked.
Because this trip would almost entirely be solo I couldn’t do any of the classic multi-pitch climbs, but there were still plenty of options to be had. And since I’m a scrambler at heart anyhow I wasn’t too distraught.
Therefore, the goal: to bag as many peaks as possible in 16 days, preferably with no rest days.
Original Plans
Day 1 – Drive to Yosemite
Day 2 – Cloud’s Rest and Half Dome from Tenaya Lake
Day 3 – Cathedral Range Traverse
Day 4 – Tresidder and Columbia Finger
Day 5 – North Peak and Mt. Conness
Day 6 – Mt. Ritter and Banner Peak
Day 7 – Devil’s Postpile and hot spring
Day 8 – Selected Minarets
Day 9-10 – Palisades (Thunderbolt/Starlight & North Pal/Polemonium/Sill)
Day 11 – attempt Whitney permit, rest day
Day 12 – Mt. Whitney
Day 13 – Death Valley, drive to Las Vegas
Day 14-15 – Climb the Black Corridor in Red Rocks, hang out in Vegas
Day 16 – Return to Colorado, see some petroglyphs in Utah
End Results
10 days of actual hiking/climbing –
Miles hiked = 117.7
Elevation gain = 36,193'
Elevation gain was determined by the difference between the starting point to the high point- unless there are multiple peaks in which case I’ve added the estimated gain from the saddle. Therefore, the total elevation gain should only be an underestimate of what was actually done (i.e. not including hills, dips, scrambling, backtracking, etc.)
Day 1 Tues, August 2 – Drive to Yosemite
After working much of the evening and night before, I started the 13 hour drive across Utah and desolate central Nevada. The only notable occurrence was encountering the Extraterrestrial Highway in Nevada, so renamed due to the proximity of Area 51 and alleged UFO sightings in the area (along with the “black mailbox”).
Day 2 Wed, August 3 – Cloud’s Rest and Half Dome – 24.8mi, 5832’ gain
Cloud’s Rest had been a goal of mine the last time I visited Yosemite in 2008. However, after starting the hike from Tenaya Lake I quickly discovered that there was a large amount of snow still covering the trail to Sunrise Pass. The few people I encountered indicated that it would be worse ahead, so after briefly checking out Sunrise Lakes I returned to the trailhead. This time around, despite the record amount of snow during the winter, the trail would prove to be nearly snow free.
At 7AM I met Ryan, a friend that I had met just months before in Zion National Park during my trip to Arizona and Utah. The creek crossing was only knee high, almost half the height when I’d been here in June three years before. Just as I was putting my shoes back on after the creek crossing a girl, Rachel, came up the trail behind us. Ryan joked that we could carry her across for a fee, but she politely declined. We chatted going up the trail and eventually convinced her that she should continue to Half Dome after Cloud’s Rest, her original destination.
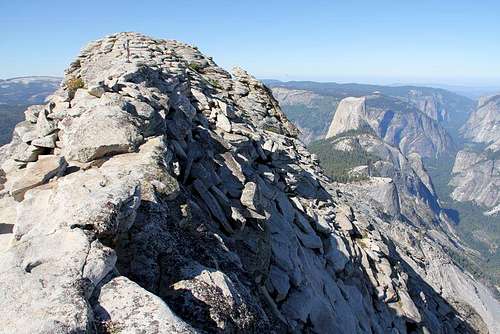
As we approached the ridge of Cloud’s Rest the views opened up to both sides, giving a 360 degree view of the area.
Tenaya Canyon gaped hugely below us, spilling into the verdant Yosemite Valley and bordered by the world famous Half Dome.
Ryan and I both agreed that, while not nearly as exposed or requiring any scrambling, the ridge leading to Cloud’s Rest was reminiscent of the trail to Angel’s Landing in Zion. At any rate, the hype surrounding Cloud’s Rest is warranted.
Arriving at the spur trail for Half Dome, Ryan decided to return to the valley as he had just bagged Half Dome days before and wanted to return for his daughter’s birthday. At the sub-dome a stern looking ranger was checking permits. I can only assume that concerns were heightened after the fatal fall from the cables only days before. We arrived at the base of the cables to find the usual pile of gloves waiting. I cruised up the outside of the cables, passing the sluggish lines of tourists (many of whom are starting to use tag lines for protection), and topped out for the second time on Half Dome. After enjoying the views we descended and started the long hike back to Tenaya Lake, getting back just after dark.
Day 3 Th, August 4 – Cathedral Traverse – 8mi, 4148’ gain
I’d read about this scramble previously on Summitpost and it was one of the instigators for this trip. What could be better than bagging Cathedral Peak, first climbed by John Muir himself, and then circling around to four other summits in the same day?
Starting up the Cathedral Lakes Trail and then branching off toward Budd Lake, I admired my surroundings. More than ten years ago I’d gone on my first backpacking trip up Rafferty Creek Trail, just a short distance away. Despite being totally unprepared for the weather (I had no clue it got cold in the mountains at night), the bugs (quite possibly worse than any I have ever experienced since, including in Alaska), the camping (I had a tent that I hadn’t used since childhood, which proved to be about 5’x5’ for two adults), or the elevation (I got altitude sickness) it continues to have a lasting impression on me. The view from the top of Fletcher Peak was mesmerizing.
![Eichorn Pinnacle]()
Gazing at the SE Buttress (5.6) of Cathedral Peak I wished that I could have climbed it, but not having a partner or any multi-pitch experience I was left instead with the Mountaineer’s Route. Just before reaching the small saddle below the peak I found a sign saying to stick to the trail, which I hadn’t even known existed. I traversed to the saddle below Eichorn Pinnacle and then made fast work of the Class 3 rock to the summit block. At the summit block I waited for two roped climbers from the SE Buttress to leave and then easily climbed the Class 4+ crack (which has solid holds) to the top.
![Cathedral Peak - South Face]()
Back at the saddle I debated going around Eichorn Pinnacle to get to the Echo Peaks. However, characteristically looking for the shortest route between points A and B I decided to simply drop off the south side. There is an obvious chimney dropping down that proved to have non-existent holds and I had to slowly squeeze and slide down to flatter ground, leaving behind a little skin and probably ripping holes in my shorts to expose my moon white ass to the public. Below this there was about 150’ of downclimbing via Class 4+ cracks and ledges, bypassing one rappel sling in the process.
![Echo Peak #2 and #3]()
At the Echo Peaks I was eager to climb whatever I saw first and cruised up Echo #5. Then hoping to find a shortcut to Echo 1, 2 and 3 I followed #5’s ridge down the other side until having to do a slightly sketchy downclimb to the ground. Regaining my bearings I climbed #1 and then followed the ridge to #2 and #3, then back to #2 1/2. As I would find with the other Echo Peaks, there are places that feel airy and exposed but the scrambling largely kept to Class 3.
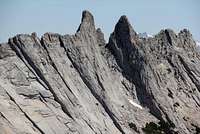
Echo 3, the highest of the nine, looks steep before the summit but pushing through the adrenaline rush it tops out to give magnificent views of Matthes Crest and the surrounding peaks. Surprisingly, the register shows few people bother to go to these great scrambling peaks. I briefly considered descending to Echo 4, but in the interest of time I downclimbed to get the others. Starting up #6 I may have taken a bad route because a sketchy looking, slightly overhanging crack requiring jamming appeared above me. Not wanting to burn time I decided to skip it and slipped over to #7 and 8.
These turned out to be short easy scrambles, but at least one of which had a short exposed crest requiring an awkward crawl or straddle to get to the high point. I’d find later that Tresidder and Matthes Crest, from what I could see, would have equally or much more exposed knife ridges. Overall, the Echo Peaks were a lot of fun and I’d love to return and bag #4 and #6 and try them all from different angles.
Quickly bagging Echo Ridge I dropped down through the middle to the south side of the mountain and traversed across to the Cockscomb. While not overly difficult or exposed, this scramble did not seem as simple as the others and I would give it a “+” designation with the Class 4 (especially including the summit block). There was at least one spot with more friction climbing than solid holds. Due to this fact I actually decided to downclimb a crack (which I would call low to mid 5th Class) between the designated 5.6 and Class 4 routes.
Not sure of the exact route to continue the traverse but as usual looking for a shortcut I scrambled up one of the major chutes to the right of the Class 4 crack and then dropped down the backside. This proved to be doable but less than enjoyable, mostly due to loose gravel and some crumbly rock. I’d rate it more difficult, or at least sketchier, than the downclimb from Cathedral Peak.
Continuing on the Mt. Althuski there are a couple of large cracks to cross. One of these has some decent exposure if jumped directly and would yield some great pics if climbing with a partner.
Finally, at Unicorn Peak I climbed the south summit in case I wouldn’t be able to get the north summit. This proved to be foretelling because as I reached the bolt and “step across” of the north summit I balked. While not at all risk averse, I still have to abide by the laws of gravity and my gut was telling me not this time. If this day had come later in my trip I likely would have continued without blinking an eye. But as it was, I turned back- thus failing the traverse with the very last peak of the day, only a couple dozen feet from the summit.
With that decision made, I raced down into the basin. I paused briefly to admire the reflections in Budd Lake with the quickly setting sun in the background and then continued down the trail. A little disappointed at my first failure so soon, I reached my car with the last light of the day disappearing.
Day 4 Fri, August 5 – Tresidder and Columbia Finger – 10mi, 2081’ gain
I had originally considered climbing Mt. Lyell, the highest point in the park, simply for that reason. Then it changed to a solo of Matthes Crest. However, after reading a little more about it I nixed that idea (looking at it from a distance I was pretty glad I didn’t do it alone). Therefore, the next option was Tresidder and Columbia Finger.
Again starting up the Cathedral Lakes trail I reached the northeast ridge of Tresidder and started up the easy rock to the northern most part of the summit ridge. The easiest route of the north summit on Summitpost is described as being found on the northwest side. I’m sure there are multiple ways up there, but I chose what seemed to me an easier route with very little exposure and better holds.
Starting at the extreme north end, continue to follow the NE ridge to the ridge proper blossoming in front of you. Just to the right of a somewhat protruding (overhanging) rock there is a short 8’ crack. At the top of this crack a short climbing traverse (decent holds, but not bomber, with minimal exposure) leads directly to a small chute which then deposits you on top. A short but exposed crawl or straddle leads to the north summit.
From the north summit, the traverse looks very knife like and exposed (exposed being relative, considering it’s no more than 30-40’ down on the west side). However, after getting on the connecting ridge the exposure generally isn’t noticeable as you scramble over and between granite boulders stacked almost like the spikes of a dragon’s tail. With caution, there are many places to downclimb on the west side by means of cracks and ledges.
Getting to the point on the ridge just short of the south summit, I pondered how someone could possibly reach the summit safely from there. Perhaps if I had gotten just a little closer I may have been able to see the bypass to the east (as things often appear harder than they actual are from a distance), but from where I was it looked very sheer and extremely exposed.
I downclimbed and investigated the south ramp. Half way up I came to the small step across which immediately leads to a Class 4+ move to the deck below the summit and the traverse across to the east side. I didn’t have good beta for after this point and apparently hadn’t taken a good look at Bob Burd’s pic of the final route to the top. If I had continued up to see more or had been better prepared, the final couple dozen feet likely wouldn’t have been a problem. But in as many days, I’d had my second failure. I would find out the next day how having company can help immensely with your courage and energy level. Today, however, I was still on my own.
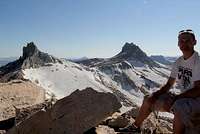
Bummed again, I cross over to Columbia Finger, with the ridge growing into a small pyramid. This scramble proved to be short and sweet. In my opinion my route was harder than the Class 3 described (again, especially with the summit block), although never exposed. At the top I was rewarded with a sidelong view of Matthes Crest to the east and an eagle flying overhead to the west.
After enjoying the summit for a while, it was an easy stroll back to the trailhead. This would prove to be the easiest (physically) and shortest day, by far, of the first five days of climbing.
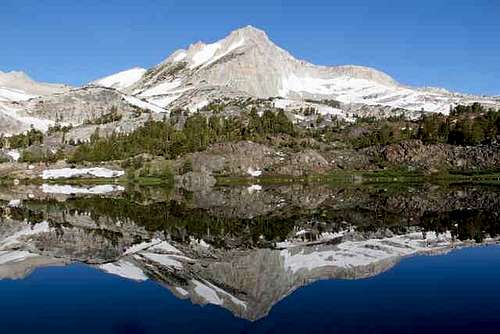
Day 5 Sat, August 6 – North Peak and Mt. Conness – 10mi, 3216’ gain
Other than the Cathedral Traverse, this climb was the one I was most looking forward to. These peaks would be higher and somewhat more technical than the majority of what I had come across before.
Getting a somewhat casual start at 7AM I started past Saddlebag Lake and then wandered over to Greenstone Lake to admire the reflection of the peaks in the water. The reflections were perfect, although they didn’t provide the awe inspiring look like with Banner Peak in Thousand Island Lake or Mt. Rainier in Reflection Lakes.
Back on the trail, I was starting to feel really bummed about not having anyone to hike with. Doing these things just isn’t the same without someone to recount the story with at a later date. Not to mention the fact that I could have gotten some awesome pictures doing the Cathedral Traverse and other hikes.
With my thoughts wondering, I transitioned between hiking on the trail, snow, and jumping over creeks, trying not to get my feet wet, before the climb up to the saddle on the NW Ridge of North Peak. Although somewhat fatigued from the previous few days, it took just 2.5hrs (including taking pictures at the lake) to reach the saddle. Settling down for a snack I started to think about what I was doing here, in the middle of nowhere by myself.
It was at that moment that I heard voices somewhere nearby. I’d searched the slope as I’d come up to see if there was anyone else attempting the NW Ridge that day, but had failed to see anyone. Finally, I saw someone crest the ridge a couple hundred feet above me, with two others following close behind. I hurried to follow and caught up to them at the first gap on the ridge. Turns out it was the guys I’d heard leaving the trailhead while I was still sleeping in my car. I was so happy to have people to hike with that I pretty much imposed myself on their group and they (Tim, Mike, and Mark) politely accepted my company.
The three gaps of the NW Ridge were fun little obstacles, climbing one, stepping across another, and jumping across another. Each could also be downclimbed and re-climbed, but the pictures are so much better when there’s nothing but air between your legs. Soon after we came to the steeper part of the ridge. This part looks intimidating from a distance but is pleasant Class 3-4 and yields some great pics looking up or down.
Once on top things flatten out and if you stay to the ridge you may notice a rock protruding slightly from the cliff that also provides some sweet pics. At this point it’s just a slog to the summit to take the mandatory summit shots and gaze down at the landscape below.
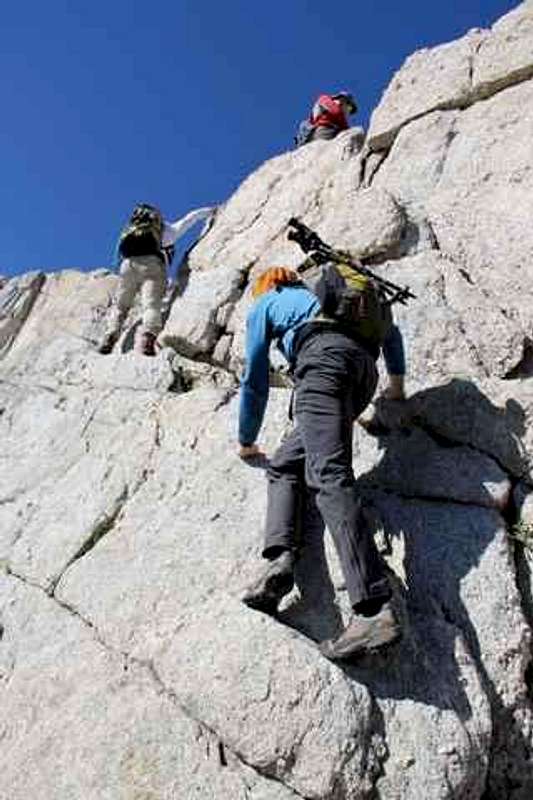
Shortly after the Conness saddle, Mark decided that he wasn’t feeling strong enough to continue up the North Ridge. This ended up working well for me because I had originally planned to solo the final 5.4 section and I was beginning to second guess myself looking at the angle of the rock. Mark kindly offered me his harness and we continued up to the first tower.
Both of the towers appear very steep and intimidating from a distance but neither is ever exposed when you’re actually on the route. Just plenty of enjoyable Class 3-4 scrambling with great views of what’s to come in front of you and great views of what you already did behind you.
At the first tower we chose to do the east side traverse, which proved to be smooth and easy. Reaching the other side you’re presented with a view of the 2nd tower, looking very intimidating indeed. I was happy to let Tim go first, who had much more experience than me. After crossing a little airy bridge and climbing a short distance, he found an angling ledge system just to the east of the ridge. He called back “Class 2, no problem.” We followed through and it did prove to be a pretty easy stroll with little immediate exposure.
Reaching the top we gawked at how steep the last 500’ appeared to be from where we were standing. At that point we were all happy to have the gear that they had brought along. We did the two quick raps and then again looked at what was ahead. From this vantage point the route didn’t look quite as steep and many ledges and cracks were evident just about everywhere. Just in case we decided to rope up and protect the route as we went.
Tim did a great job of leading and belaying as Mike and I followed (although both had done plenty of far harder routes before). For me, however, it was my first roped, multi-pitch climb. I never really had an interest in it before, having never been exposed to it, but found that it was a lot of fun.
Soon after, two guys came up behind us, downclimbed the rappels and quickly passed us, reinforcing the point that the route can be soloed. When they were 50’ above us, one of them somehow knocked loose a roughly watermelon sized rock. Everyone was yelling “rock” as it sailed past Tim and me, luckily safely off to the side. Mike, however, was just coming around a corner and barely had time to duck back behind the edge as the rock careened past, missing him by what seemed like inches. Mike was pretty shaken up by the incident and we wisely let the other guys go ahead while watching their every move until they were out of sight. To this day I don’t know how someone could be so careless as to knock a boulder of that size loose with other people directly below.
![Mt. Conness - North Ridge]()
After that it was smooth sailing to the top, not including a couple of mid 5th Class cracks near the top (likely avoidable if you look around). By that time it was getting late, having taken longer than necessary surmounting the towers and then roping up for the last 500’.
We started down the East Ridge and were dismayed by how much snow was still in the basins below. In my experience, snow normally makes for fast progress going down, but for some reason nearly all of the snow I would encounter during my trip was deeply sun cupped. Progress is slow because it is easy to turn an ankle or hyper-extend a knee. This also made it hard on Mike who had had a bad injury years before.
So at this point I was forced to say goodbye and forge ahead on my own because I had yet another big hike the next day. From above we had eyed a route traversing the ridge all the way around to the mountain beside Saddlebag Lake. Tim and Mike would end up choosing the standard route but I made the traverse around the base of the East Ridge, crossing a little bit of sketchy snow and rock, until I reached the saddle. I continued right contouring on the mountain, trying to stay as high as possible because I knew there was likely to be cliffs not far below. Finally, just as dark was closing in, I came around a corner to see the lake a few hundred feet below across a field of talus. Hungry and tired, I trudged back to the trailhead to report the afternoon’s events to Mark and then drove to the next day’s trailhead at Silver Lake.
Day 6 Sun, August 7 – Mt. Ritter and Banner Peak – 22mi, 6826’ gain
One word. Brutal. This is a long hike and an exhausting climb. Maybe it’s the lack of good sleep and big meals. Or maybe it’s the fact that this was my fifth day in a row of big hikes, having gotten done at or after dark three out of four nights (this would make four). I was tired but I was also pumped to knock this one out.
Silver Lake is not the ideal starting location. It is more than 1000’ lower than Agnew Meadows. The first four miles are a constant climb with little more than one waterfall and a reservoir to look at. The main reason for starting here, besides avoiding the circus act of accessing Agnew Meadows, is that I would also get to see Thousand Island Lake.
(Side note: the trail is poorly marked and hard to follow from the power company’s buildings until past the dam, bridge and 100yds beyond.)
After the long climb the terrain becomes easier but it is still a rolling landscape, dotted with tranquil lakes. Except for a brief view of the Minarets and Banner in the distance the skyline is largely hidden until you get much closer to Thousand Island Lake. Then everything suddenly opens up and Banner Peak rises abruptly behind the lake. Unfortunately, the wind had picked up by the time I arrived at the lake, erasing the mirror like surface that I had seen in pictures. The good part was that it helped to keep the mosquitoes from swarming.
At the far end of the lake the climbing starts again as the mountain, still largely covered by snow in the low areas, rises to the saddle above Lake Catherine. I thought I’d been making decent progress, but it had taken five hours to get this far and I still had more than 50% of the elevation to gain. The climb to North Glacier Pass, though hampered by crossing several snow patches, passed quickly taking just one hour.
Reaching the saddle I wondered how much snow there would be on the other side and what I would find ahead. Not for the first time, I considered turning back but seeing the rocky ridge largely snow free I decided to continue on. Climbing this small ridge went quickly and I hoped that it might lead straight to the R-B saddle. This ended up being not the case and I was forced to drop down to the glacier. Using the large sun cups as a stairway, I reached the R-B saddle just an hour after leaving North Glacier Pass.
This is where things slowed down. Snow filled the chute going up the North Face of Mt. Ritter for 100-200 feet, just steep enough to make progress slow and tedious without any snow gear. Trying to get to the nearest rock, I mistakenly started climbing a buttress on the right instead of keeping to the left. Backtracking and traversing to the left, I could see the summit just a couple hundred feet away. However, the easiest route that I could see, an angling shallow chute to the left, was fairly solidly packed with snow and looked slippery. The next best thing I saw was a vertical “chute” interspersed with ledges every 10-15’. Though a little sketchy and rating Class 4+, it lead straight to the top. I gave my mom a quick call to let her know that I was, so far, safe and started back down. The climb had left me a little shaky, but I knew it would be ok as long as I took my time going back down and didn’t do anything stupid.
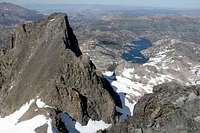
![Banner Peak and Garnet Lake]()
It was already starting to get late and I briefly considered skipping Banner, but this is what I’d come for and threw that idea out. I’d done Ritter first for exactly this reason, so that I wouldn’t have an excuse not to continue on. The climb up Banner was excruciatingly slow, the last several days catching up to me. Although mostly only Class 2, I was able to take no more than about sixty steps at a time before I needed to rest. Then what I thought would be the top turned out to be a false summit. Finally getting to the top I took a few pictures and then started the long descent back to Thousand Island Lake, unhappily looking forward to the hike back to Silver Lake.
![Thousand Island Lake from Banner Peak]()
At this point I knew that I wouldn’t make it back before dark, but that was ok because I also knew that I’d be well off the mountain before that did happen. About a mile past Thousand Island Lake full darkness descended, leaving me walking past dark silhouettes of trees in the quickly cooling evening. I was exhausted and sore footed by the time I finally got back to my car at 11PM, making for a 16 hour day.
Day 7 Mon, August 8 – Devil’s Postpile and Hot Creek Hot Springs – 5.5mi, 500’ gain
This was my first planned easy day of the trip, well earned after 74.8 miles and 22,103’ of elevation gain in just five days. A huge accomplishment by itself but I was only half done.
When I’d arrived in Mammoth Lakes the night before the city was dead, with hardly a soul around. Today, as I made my way toward Devil’s Postpile, the scene was completely different. Hundreds of people crowded the area waiting for the bus shuttle or renting mountain bikes to take on the many downhill trails on the mountain. It felt more like a concert than a wilderness area. The crowds must scare off the wildlife because there was nothing in sight the entire day, although the bus driver would later say that it was easier to spot bears downtown rummaging through dumpsters in the middle of the night. So much for asking all of the tourists to not feed the wildlife when the locals can’t do the same.
![Minaret Falls]()
On the trail to Minaret Falls I soon realized how drained my body really was. With little elevation change and few rocks or roots to impede progress I was feeling the miles from the previous day. The falls were an interesting sight, with water cascading in every direction, apparently not lacking a water supply due to the large snow pack.
Devil’s Postpile, the main attraction for the area, was also very unique. Oddly enough there were attempts to dam the area in the early 1900’s. A trail circling above gives close up views of the tops of the hexagonally shaped columns.
The views at Rainbow Falls were equally nice. For my first visit, the park was worth the $7 entrance fee and crowds, but just barely.
(Photrographer’s Note: Arriving early in the day for Minaret Falls would make for nice flowing water pics, given the right vantage point. For Rainbow Falls, early afternoon gives the best light for even exposure and the rainbow.)
After that it was on to Domino’s for pizza and a nice soak in the nearby hot springs.
Day 8-10 Tues-Th, August 9-11 – Palisades and Le Conte Canyon – 25mi, 7490’ gain
This is where plans started to change drastically from what I had hoped to accomplish. I had originally planned to do a selected loop of the Minarets on Day 8, but after seeing the liberal amount of snow still covering the base of the mountain I regretfully decided against it, not being a fan of mixed climbing.
Therefore, I decided to hike into Thunderbolt Pass to get an easier start on the Palisades the next day. Hopefully it would be a more realistic time frame than the original two days I had scheduled. Not to mention the fact that from here on out the climbing would involve no mere 11, 12, or 13,000’ peaks but all 14ers.
From reading beta I knew that a true traverse wouldn’t be possible for me due to the 5.5 crack going up North Palisade nor wanting to carry rope for the Starlight raps. However, I figured I could do a North Palisade to Sill traverse and then do Thunderbolt and Starlight the last day before heading out.
That didn’t work out as planned either since I was a little confused at Bishop Pass as to what direction Thunderbolt Pass lay. I had to get a little help with my bearings by a small group making slow progress to Mt. Sill and was forced to camp at Bishop Pass the first night.
Now, because of uncertain snow conditions ahead and a slightly more distant start than expected, I decided to tackle Thunderbolt and Starlight first. The way to Thunderbolt Pass ended up being tedious. The general consensus seems to be that dropping down farther into Dusy Basin instead of traversing tends to be a much faster route because of the topography encountered while trying to contour.
Finally at the pass, I dropped my backpack and started up SW Chute #1 which still had a large amount of snow all the way up to the chokestone. It was just possible to either squeeze between the snow and the wall or climb short sections of Class 3 rock on the side of the chute. At the chokestone, I took the Class 3 route that bypasses this obstacle. While this chute is supposed to be the easiest way to the summit, this bypass is a narrow and slightly sloping ledge with no good handholds- it wouldn’t be pleasant for a beginner.
Still somewhat fatigued from the days before, I made slower than normal but steady progress up the mountain. At the top of the chute I must have missed the opportunity to take the easier Class 3 ledges to the right of the summit because I ended up going up several Class 4+ cracks on the north or NW side of the summit, within spitting distance of at least one rappel sling.
At the top I marveled at the summit block, but I wasn’t going to attempt it solo in sneakers- officially making it my third failure of the trip, but oh so close. Although I knew I wasn’t likely to actually top out I was a little bummed and thought about going back the way I’d come. This time my curiosity won out and I went in search of the Class 4 descent route to Starlight.
While a little intimidating looking at it from above (and again passing at least one unnecessary rappel sling), there was actually little immediate exposure until the step across at the bottom. This part was, indeed, very exposed but there were bomber holds across the ten feet or so of open rock. After that it was just a matter of carefully descending the cracks of the Class 3 slabs to the saddle.
Starting up Starlight the going was pretty easy, even at the Dike Bands, but above them my progress was halted when everything seemed to drop off in front of me. No beta or pics (summitpost, books, or otherwise) I’d seen had indicated anything of the sort. After several minutes of looking around the only thing that looked reasonable was to descend at least 100’, traverse the low point, and then climb some cracks or chutes that, from my vantage point, likely looked pretty sketchy.
So just a couple hundred feet from the top I was again forced to turn back. Starting down from the saddle I hoped that the large chute I was in lead to one of the Class 4 routes down from the mountain. In short, it didn’t. A lot of loose scree was interspersed by a number of short drops, at least three (but I think four) of which had rap slings.
Fortunately, all of them were downclimbable- although one of them was probably the hardest downclimb I’ve ever done, including many of the canyons that I’ve done previously. It started as a wide chimney maneuver that was a huge stretch and slipping would have meant trouble. Below that there was yet another difficult, but less exposed, downclimb that lacked any great holds and was too far to simply drop down. Eventually at the bottom I again had to squeeze between the snow and the wall or downclimb short sections to get back to Thunderbolt Pass.
Between the amount of snow encountered already and the mention of a fair amount of snow on the upper route of North Palisade even in normal years I was hesitant to attempt more the next day, especially on my own. So intending to hike out that night I started back for Bishop Pass, cursing the fact that I’d brought my backpack that far over the somewhat awkward terrain for nothing.
Back at Bishop Pass I again encountered the people that were heading for Mt. Sill, who had somehow made less than a half mile of progress that day. They suggested hiking down to Le Conte Canyon (on the PCT). I decided to give it a try while I was there.
Long story short, it’s a mostly uninteresting trail (compared to other trails in the Sierras) until you get to the waterfall and water cascading down the smooth granite into the canyon below. However, at that point there is a 3300’ climb back to Bishop Pass. Having just brought a small daypack I was able to cruise up 1/3 of that until my fatigue started to settle in again and my pace slowed accordingly. I felt sorry for all of the backpackers going up the trail to South Lake in order to resupply. Eventually back at Bishop Pass it was mostly downhill back to the trailhead, although under the weight of my full pack again.
Ironically, back at the trailhead I met a guy who had just done Agassiz but who also had wanted to do the Palisades (and who also turns out to be originally from near where I live). Funny how things had worked out for Mt. Conness but I just missed this connection.
Day 11 Friday, August 12 – Attempt Mt. Whitney Permit
I’d originally planned to day hike Rae Lakes on this day, but it was probably better to have another rest day. At the visitor center there were at least a couple of dozen people milling about waiting for permits. After the lottery I’d ended up with number 18 out of 23. I thought I’d be screwed and was trying to think about my other options. However, when my number was finally called there was somehow still plenty of availability. Many of the people weren’t getting Whitney permits, but it was still hard to believe that there were that many cancellations and no-shows (they did the lottery at the same time, instead of a second one at 2PM).
On a side note, I spent the afternoon surfing the net in McDonald’s where I was nearly constantly surrounded by French tourists. Can anyone tell me what the draw to the area is? Death Valley, Mt. Whitney, or just passing through on their way to Yosemite?
Day 12 Saturday, August 13 – Mt. Whitney and Death Valley – 12.4mi, 6100’ gain
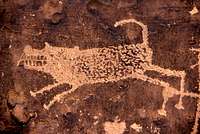
And now for the main attraction… Well, not really. Although it is the ultimate trophy as the high point of the lower 48 (14,494’), it’s not much of a challenge unless you’re doing a technical route. The Whitney Trail is considered Class 1 and even my choice, the Mountaineer’s Route, is only Class 3.
For some reason I decided to get my earliest start of the trip, leaving the trailhead at 5:20. Before I knew it I was already at Lower Boyscout Lake. The summitpost beta indicated that the route to take is swinging to the left and then back to the right below Upper Boyscout Lake. However, I was the only person to be doing this. The standard trail seems to be to stay to the left of the creek, cross it at the midway point, and then continue up the granite until just below UBL. This area, in my opinion, is probably the prettiest of the route. Too bad that the fresh batteries I thought I’d put in my camera the night before had lost their charge.
Anyway, just below UBL turn left and go over a small saddle and then follow the trail up along the wall to a second small saddle on the right below Whitney that leads to Iceberg Lake. At this point I made a mistake because I was too close to the base of the mountain and couldn’t tell which chute to follow. I started up the chute on the left, which looked like the pic from summitpost, but this is WRONG and seems to lead to the East Face/Buttress routes. If I had started from closer to Iceberg Lake the large gully that is the Mountaineer’s Route would have been clear just a stone’s throw to the right.
This chute, depending on your route, is nearly all Class 2, although containing lots of loose rock, until you get to the top. Here, you turn sharply to the left and climb about 150’ of Class 3 rock. Very easy compared to nearly everything I’d done already, but intimidating for someone not used to that kind of thing. (In fact, I’d pass two guided groups on the way down that roped up for it, paying ~$580 a pop for the privilege.) From there it was a short hike to the highest point in the continental U.S., topping out in about 5 hours exactly. Not bad considering what I’d already been through.
![Mt. Whitney]()
On top I managed to warm up my batteries enough to fire off a few shots. I’d intended to swing over and bag Mt. Muir and then double back for Mt. Russell. However, I was uncertain which mountain was actually Muir and no one I talked to knew either. Then forgetting that the easiest way to the Russell saddle is to first descend the North Face, I went back down the Mountaineer’s Route and then started descending toward the saddle. After a little more than 100’ I reached a point that looked too sketchy even for me. Not too excited about another mountain anyhow, I decided to head out.
This ended up being pretty sweet because I’d be passing through Death Valley on my way to Vegas, which meant that I’d be on the lower 48 high point (Mt. Whitney, 14,494’) and low point (Badwater, -282’) in the same day. It was interesting to see the signs saying “Elevation Sea Level” and not have any water in sight. At Badwater the temperature topped out at 115 degrees, even thought it was after 6PM.
Day 13-16 Sun-Wed, August 14-17 – Vegas, Red Rock and drive home
The rest of the trip was mostly just relaxing with friends in Vegas. I did manage to find a partner to go back to Red Rock again for a little sport climbing. I had only lead one route in the past, but that day lead up to a 5.10a. Not bad considering I hadn’t done any real climbing since the last time I was at Red Rock three years ago.
Then a brief stop in Utah for a few petroglyphs.
In the end I was a little disappointed that I’d been unable to reach the top of a few mountains and that I’d completely skipped some others. However, considering the mileage, the elevation, and doing fairly committing routes largely solo I was still pretty proud of the effort. I’ve been telling my friends that the Sierras are generally much more difficult than nearly every major mountain in Colorado and I still hold that opinion. Plus, I feel confident that most of what I did miss is doable and all it takes is a return trip to try it again. The Sierras aren’t going anywhere, I’ll be back…


Comments
Post a Comment