
-
 20763 Hits
-
 81.18% Score
-
 13 Votes
|
|
Mountain/Rock |
|---|---|
|
|
38.70900°N / 108.9747°W |
|
|
Mesa |
|
|
Hiking, Scrambling |
|
|
Spring, Summer, Fall, Winter |
|
|
7045 ft / 2147 m |
|
|
Overview
 Small community of Gateway and The Palisade above
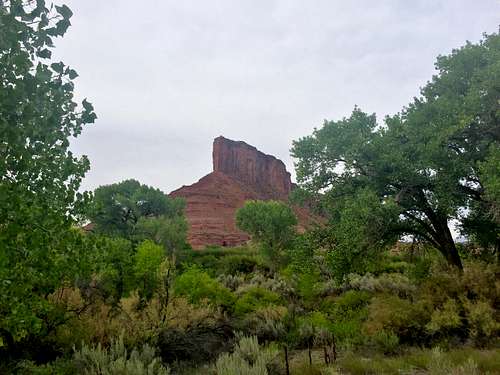 The Palisade
You will also get to explore ruins of an old cabin where supposedly a miner looking for uranium lived in 1950s. One wonders how he brought his bed up there! I heard by helicopter.
The views from the summit are spectacular - Dolores river and valley below, and all the way to La Sal Mountains in Utah. ![The Palisade]() The Palisade
The Palisade![The Palisade]() The PalisadeFollow direction to Gateway Colorado, most people would be arriving from Grand Junction area, taking US -50 south and turning onto Colorado 141. This section of the road is part of the scenic Unaweep - Tabeguache Byway. It is truly a fabulous journey though history, geology, culture and beautiful scenery. It is about 53 miles from Grand Junction to Gateway and count at least 1 hr of driving.
The PalisadeFollow direction to Gateway Colorado, most people would be arriving from Grand Junction area, taking US -50 south and turning onto Colorado 141. This section of the road is part of the scenic Unaweep - Tabeguache Byway. It is truly a fabulous journey though history, geology, culture and beautiful scenery. It is about 53 miles from Grand Junction to Gateway and count at least 1 hr of driving.
I think rating the difficulty of the climbing is hard. I found the hardest part the approach up the steep ridge, especially since we did this in August, with a late start and it was very hot. I enjoyed the scamble/climb section. We did not know what to expect and per some reports on List of John, the climb was rated as 5.4 and ropes were needed. However, we did not use the ropes on our ascent at all. We found it useful for some of the rappels. There are no fixed lines as of summer of 2017 (per some reports there were fixed ropes at some point), rappel stations appeared all relatively new, with 2 opposing carabiners. The multitude of small cairn higher up on formation helped to find the path.
This is a highly recommended adventure with amazing scenery and an adventurous summit. The trip can be combined with climbing in Unaweep Canyon or Wild wild west area (Sewemup Mesa with Indian Creek type of cracks is just a few miles away).
Mountain Project describes some more difficult ways up, rock climbs from 5.11+ to 5.13 range for those interested in more challenge.
Getting There
 The Palisade
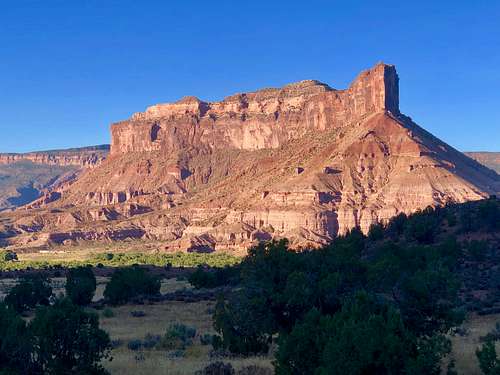 The Palisade
From Gateway General Store take the first dirt road before reaching Dolores river marked as 4 2/10Rd. It is a good dirt road, easily passable by 2 WD low clearance vehicles. Drive following the Dolores River and passing some farms. At about 2 miles there is a small parking place with some campsite. We chose to park there and hike from here. However, when we were high up on the Palisade, we noticed there was another dirt road about 3/4 mile further and you could drive much closer to the Palisade formation. ![The illustration of the route]() The illustration of the route
The illustration of the route![Steeper section of the slab]() Steeper section of the slab
Steeper section of the slab![Chimney/OW crack]() Chimney/OW crack
Chimney/OW crack![Slick Rock walk]() Slick Rock walkDifficulty: low 5th class with exposure (List of John rating is 5.4).
Slick Rock walkDifficulty: low 5th class with exposure (List of John rating is 5.4).
Route
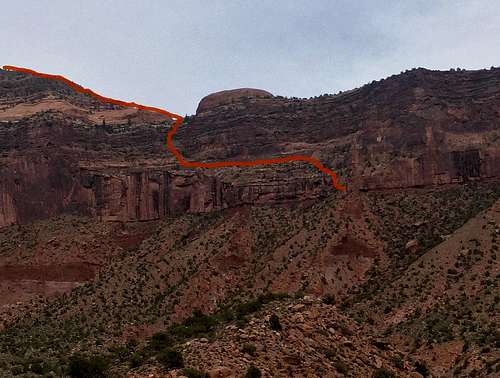 The illustration of the route
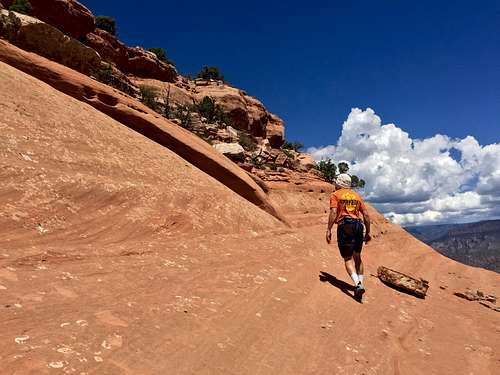 Steeper section of the slab
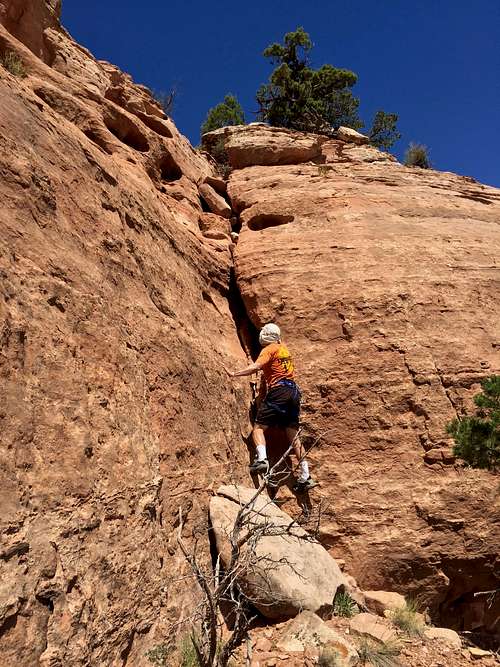 Chimney/OW crack
 Slick Rock walk
Length: depending where you park, our trip was 6 miles RT
Approach to the formation: from the parking spot find your way to the highest appearing rib reaching the west side of the Palisade, head in that direction. We found a cattle trail from our parking spot 2 miles from Hwy 141 and followed it. The walking was initially easy, across desert with cacti and desert vegetation. Once we reached the rib leading to the obvious weakness and sort of below a small tower, the hiking became steep and more loose. It was really hard during the summer with a late start! Plan accordingly.
Climb/scramble part: The fun starts here. I considered the approach in the heat of the summer heinous.
I will not describe it by pitches since we did not use rope on our way up at all. We did not know what to expect, so we brought a light 7.8 mm rope, webbing, slings and about 5 camalots with us. Obviously, we did not need any gear, but make your own decisions when preparing for the trip.
Part 1: from the top of the approach scramble up on ledges and slightly traversing to climber's left on exposed 4th class terrain. This will bring you to a beautiful looking dihedral corner rising about 4-5 meters up. The rock is beautiful and clean here. List of John rates this as 5.2, but we felt comfortable without ropes, positive hand jams, nice footholds. You will see a set up rappel station once you reach the top of dihedral.
Part 2: traverse to climber's left and continue on a trail, follow cairns. This is class 2-3 walking with exposure. Some sections you are on a slick rock with a narrow path though - classic! beautiful! fun!. Not technically difficult, but some may be afraid of the exposure.
Part 3: 4th class to low 5th class slick rock: climb up friction slabs, look for weakness, may go further left and traverse on slick rock to the right. There is no protection, and it is exposed, but not technically difficult if used to climbing on rock. Again, once you reach the top of the slabs, there is a set up rappel station and cairns. If you decide to rope up, you will need 30 meters of rope to reach the rappel station.
Part 4: more going up, zig zagging, following the cairns until you come to a steep looking headwall with built in rocks to position you a little bit higher. There are cairns here, and we got a little bit off the route here. You will be traversing higher up to climber's right and it did confuse us. Remember for orientation here, the rounded sandstone formation seen will be on your right and the path is to the left of it.
Part 5: the most steep section of climbing, some rate is as 5.4, but again short. Step on a little ledge, reach over the steep wall - there are good handholds, pull yourself up, trust your hands - solid. I used one hand for mantle and was able to get my leg over and kneel. Some people choose to do ungraceful looking belly flop here - whatever works. Just don't fall. Continue higher up on a slab and reach another belay station. Enjoy reaching the lower section of the Palisade.
Part 6: we left our rope here thinking we are done climbing. It appeared that summit is not that far, continuing further on a sandstone, but it was still a way up there. Bypass cryptobiotic soil higher up on a sandstone. Go towards the easiest appearing weakness in the sandstone - with some 3rd class moves and continue up on easy terrain. The slick rock becomes again steeper and we used a sandy seam with some grass in it to get through this section - this was again low 5th class friction slab climbing (5.0) for a very short section. The seam had some ok handholds.
Part 7: continue higher up on easy terrain following cairns zig zagging and finding the easiest path slightly to your right. You will start to see signs that someone has lived here - old rusty cans.
Part 8: the last section of climbing, sort of a wide crack, OW, chimney section, rated again as low 5th class. The climbing is easy with good hand and foot holds.
Part 9: walk to the summit, enjoy the spring bed on the way up, explore the ruins of a cabin (all fallen), do not step on rusty nails, tons of old cans and dishes. Continue higher up to the actual summit - take photos with an old steel egg beater and an old hammer, sign into a glass register. The half adventure is over -remember more accidents happen on the way down. Consider using rope for some of the climbing descents. Return the same way as you came up.
The Palisade is within The Palisade Wilderness Area, and the land is owned by BLM. The Wilderness area encompasses also several Precambrian rock faces that line Unaweep Canyon.
When to Climb
Summers are hot and there is not much shade. You do ascent on the west side of the formation, which provides some shade early in the morning, but the approach is hot! I would recommend spring, autumn and if dry also during the winter. Bring plenty of water.Camping
There is a very primitive campsite just below the formation. Sleeping in a car is option as well. There are also primitive campsites along Dolores River.Established campgrounds would be further away: Divide Forks Campground. Basically, as long as you are not on private land, and you find some secluded spot off dirt road, you are usually safe with camping (as long as there are signs saying otherwise).
The tiny community of Gateway also boasts with a 4 star resort hotel if you want to spoil yourself.
seano - Nov 30, 2019 1:41 pm - Hasn't voted
Crux bypassYou can actually get around the steep step by circling right, then going over the red sandstone blob. I found this alternative much less intimidating, especially with a dusting of fresh snow.