
-
 12669 Hits
-
 85.87% Score
-
 21 Votes
|
|
Mountain/Rock |
|---|---|
|
|
41.20407°S / 71.50403°W |
|
|
Mountaineering, Trad Climbing, Aid Climbing, Scrambling |
|
|
Spring, Summer, Fall |
|
|
7904 ft / 2409 m |
|
|
Overview
Torre Principal, as boring as the name sounds, is actually a spectacular tower and the highest peak in the entire region known as The Frey. In fact, I believe the nearest higher peak is the massive Tronador Volcano located on the international border with Chile well off to the west. Anyone climbing this tower surely has come a long way to do so, unless you live in Bariloche. This area is a world renowned rock climbing area that attracts many people, and Torre Principal being the highest peak here definitely draws some attention. Featuring well over 20 quality routes, the rock on Torre Principal (as well as all the surrounding towers) is superb granite only rivaled by the big walls found at Cochamo just over the border.
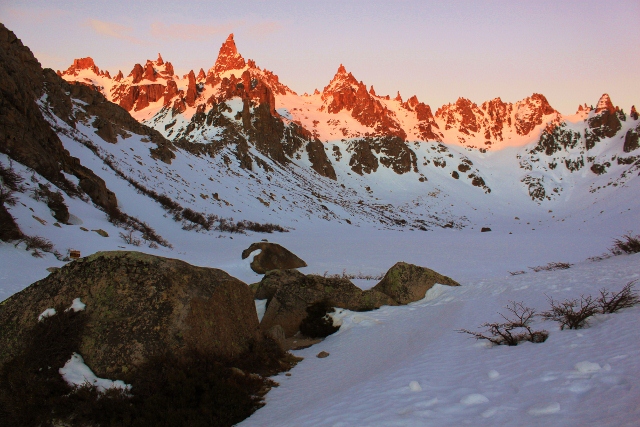
The standard route has three pitches with the third being the crux, and well bolted. As long as you have some lead climbing experience on both trad and sport up to around 5.9 you should be fine climbing this route. Other routes range in difficulty from 5.10 up to 5.13 but only the standard route will be described on this page. Camping at Laguna Frey offers stunning views of Torre Principal especially at sunrise (see primary photo) and the refugio is perfect for supplying your endless craving for pizza and beer after many hard days of climbing. Just be sure to bring enough cash!
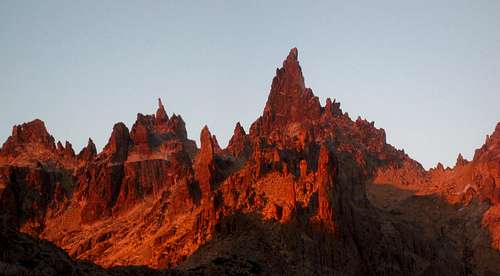
Sunrise on Torre Principal
Getting There
Getting to The Frey can be an ordeal. Flights worldwide arrive in Santiago Chile, and Buenos Aires Argentina. From either city, you can take buses to Bariloche. I flew into Santiago from the US and took the night bus south to the town of Osorno (11 hour ride; ~$40) and then took the international bus from Osorno to Bariloche (6 hour ride; ~$45). From the Santiago airport, there are airport buses that go to the Borja and Alameda bus terminals in the center of the city. Do not let an airport taxi driver tell you otherwise and just ignore them. Even if you don't know Spanish, it's not too hard to buy bus tickets. Just ask at a bunch of the various offices...there are literally dozens of bus companies and someone will be going to the town you want. Pullman, Cruz del Sur and Cruz Norte (Chilean) are good ones for going south from Santiago. Via Bariloche (Argentinean) is the primary company serving the Bariloche region. The town of Bariloche is a very popular tourist destination, ski and climbing town, and party central. You could spend weeks around Bariloche exploring the surrounding mountains, lakes and the town itself.
If you fly into Buenos Aires (I haven't been there yet) you'll have to take buses west, but I couldn't say much about how to navigate Buenos Aires. Also keep in mind that bus fares in Argentina are sometimes twice as much as those for similar length routes in Chile. I don't know why. Once in Bariloche, you will likely be at the Terminal de Omnibus which is about 3 miles east of the center of town. Here you can speak to someone to get information, and a map of the area. They will usually know English and can suggest places for you to stay, where to buy certain things and provide you with a bus schedule (which is a giant lie BTW). Once you have gathered all the information you need to get started, buy the ticket for the shuttle into town ($1) and get off at the historic downtown area next to the park. The cheapest hostel in town is the "Backpackers Hostel" just west of the intersection of Ave Moreno and Ave Morales. It's about $15/night and a major bus stop is just across the street. Also, the Club Andino is one block up the hill and many places to eat are just a few blocks down Ave Mitre (the main street in town).
Getting to The Frey from town is actually quite easy. Just hop on one of the many buses headed for Villa Catedral. It's roughly an hour ride and costs about $2 I believe. Be sure you know this is the ONLY local bus route you are allowed to pay the driver in cash. All other local routes, such as route 20 heading to Colina Suiza, require you to buy and pre-pay on a card at the main office located at the intersection of Ave Elflein and Ave Rolando. This office isn't open very long so if you plan to visit other areas around Bariloche make sure you get the card prior to getting on any bus other than the Cerro Catedral route.
Upon arriving at Cerro Catedral you'll quickly notice it's a giant ski resort. From the massive parking lot, look for the signs for Refugio Frey. The trail starts on the west side of the parking area just south of the main office for the ski resort. Many small stores and places to grab some food can be found along the north and east side of the parking area. The trail to Refugio Frey at first heads south and is gentle, offering great views of Gutierrez Lake below to the east. After a few miles though the trail gradually curves west, reaches the creek and climbs steeply up to the refugio, 2,300 feet above, and about 6 miles from the parking area. The hike takes 2-3 hours with day packs or 3-5 hours with heavy packs filled with climbing gear.
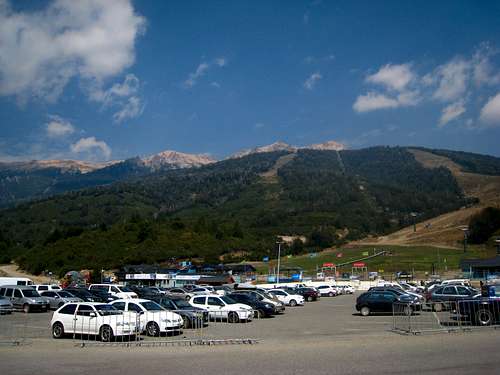 Cerro Catedral parking area | 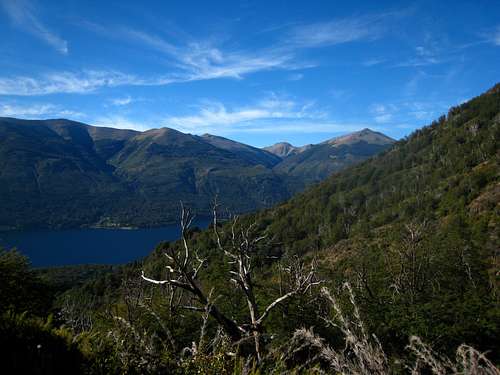 Views of Gutierrez Lake from the trail | 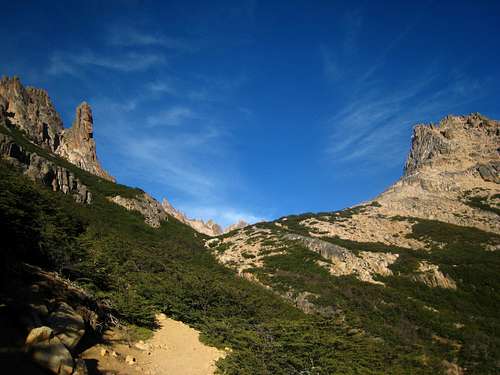 Hiking on the main trail just below the refugio |
Another option for getting to the Frey is taking the ski lift up. They keep two lifts running throughout the summer (the gondola and one smaller lift above it) to take tourists up to treeline and hike around but they also let you bring your packs. At the ticket office, you can buy the pass which is about $20 and hop in the gondola for the 10 minute ride up the hill. At the top you can get on a second lift to take you all the way up to about 1,900 meters which is already over 100 meters above the elevation of the refugio. Once at the top of the lift, follow the trail west and after only 100 meters uphill, you'll reach the crest of the ridge marked by a couple sticks in the ground. From here it is a fairly easy traverse on the east side of the ridge staying around the 2,000 meter level. Although the trail is very rocky, red dots painted on the rocks make following the path very easy. If you have heavy packs just be extra careful about your steps. There isn't much exposure but you still wouldn't want to fall and risk rolling over a few times. The other advantage of this approach is the clear and excellent views to the east while traversing. Tronador Volcano and dozens of stunning peaks fill the horizon, assuming there is no smoke!
After about 1 hour of traversing southwestward, you will come to a large rock with arrows pointing to Frey and Jakob. Continue left and follow the route to Frey. You'll pass between two stunning rock towers (Torre Piramidal and Roca Inclinada) and reach a broad saddle roughly 400 feet above Laguna Schmoll. The rest of your hike in is all downhill! Descend to Laguna Schmoll by making a downhill traverse to the left following the weakness in the cliffs (marked by red dots). Don't head straight down as cliffs block the way. Once at the lake continue down the trail to Laguna Frey to the hut. This approach from the top of the ski lift takes about 2-3 hours but requires much less effort than the standard trail if you have very heavy packs. Note that you will not be allowed to return this way and ride the lifts down because the tickets are only good for one day but once you are at the Frey, hiking down the main trail would be the better option anyway.
See the main area page for The Frey for more detailed information about getting to the refugio! There are many options.
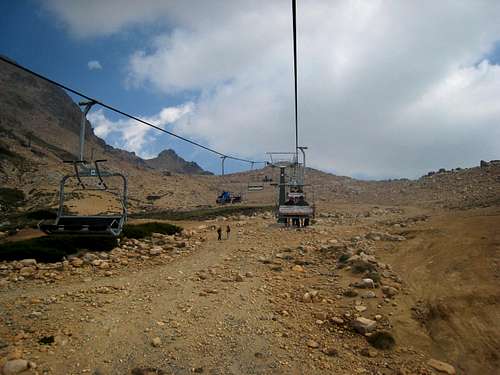 Riding the Cerro Catedral ski lift | 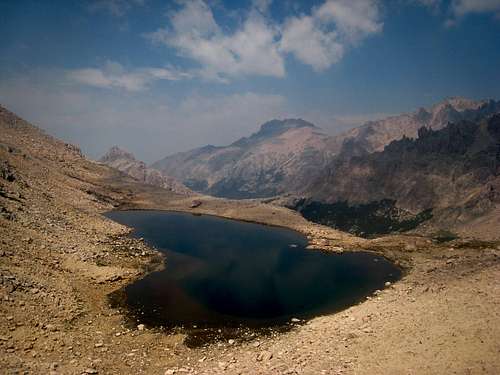 Laguna Schmoll from the saddle above | 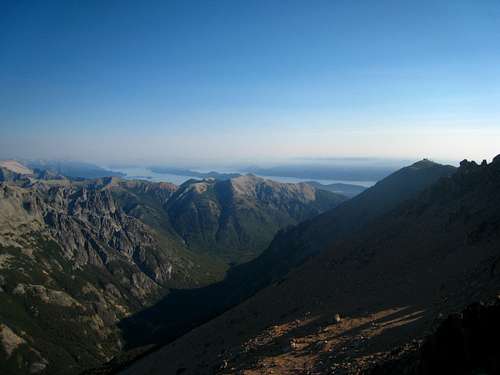 View north from the saddle above Laguna Schmoll. The shady slope is the traverse from the ski area. |
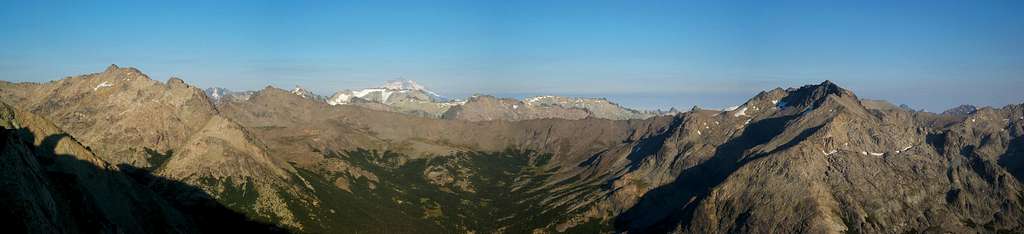
Tronador and surrounding peaks from the traverse to Frey from the ski area, near the saddle above Laguna Schmoll
Approach
Once at the refugio, which is at 1,759 meters in elevation, you'll notice a nice tower directly above to the south, which is Aguja Frey and perhaps the most popular tower to climb in the area. Looking across the lake you will notice the obvious tower that is clearly higher than the rest. This is Torre Principal and it takes about 2 hours to hike to the base of the technical climbing portion. Follow the trail that heads around the south (left) side of the lake and just before reaching its far end, locate a trail heading up the hill to the broad saddle between Pico Vara and Torre Principal. It's only a couple hundred feet up to this saddle at which point you follow the ridge west past the base of Aguja Abuelo and M2 (other rock towers) and weave through small cliff bands on steep talus. Upon reaching the top of a steep talus slope, traverse more or less horizontally at 6,550 feet aiming towards the large east facing scree slope descending from the obvious saddle between Torre Principal and its sub-peak to the north. Ascend this somewhat loose slope for 700 feet and instead of going to the saddle, scramble up directly towards the north face of Torre Principal. There are many ways to get up at Class 2+ on large blocks but harder Class 3 scrambling variations exist.
Climbing the 25 foot Class 4 flake to start the climb. The cave is just to the right.
Near the end of the approach, you will come to a steep wall with a large flake on it just left of a cave covered by huge chockstones (shown in the far right photo in the table below). Climb this flake (Class 4; shown in the photo just above) to get to a tiny notch atop the chockstones where you will get your first views of Tronador to the west. Leave any approach gear below this 25 foot flake and rack up here because the final rappel brings you back to this point rather than the tiny notch above. If you get here early enough the lighting on Tronador will be fantastic.
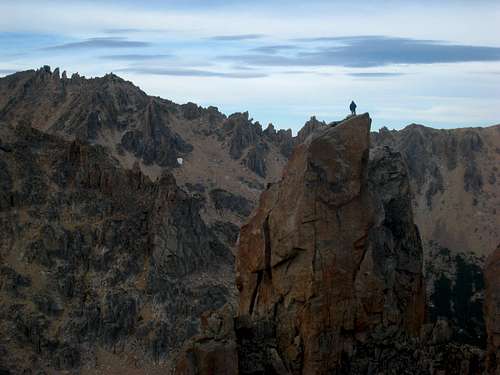 Climber atop M2 on the approach 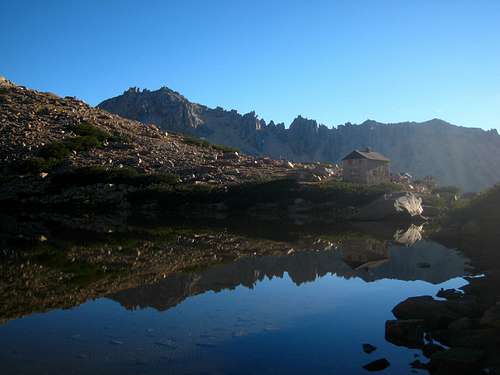 Sunrise reflection on Refugio Frey | 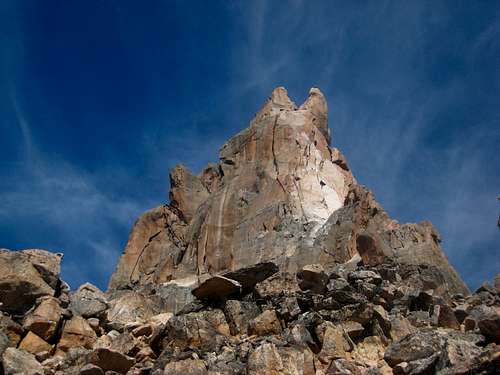 Approaching Torre Principal  Tronador from the base of Torre Principal |  The cave with the 20 foot 4th class section just to its left |
Normal Route - 6a (French) or 5.10a (YDS)
From the small notch above the 25 foot flake, the route begins directly above you on the low angled rock covered with features and good stances. There are 3 pitches to the normal route, plus an approach pitch, which heads directly up the north face taking advantage of excellent cracks and ledges, and finishes on a wild, bolted summit pitch consisting of tough face climbing. Note that many other trip reports and route descriptions say there are 5 pitches on this route, but those reports say the 4th class flake by the cave, and the approach pitch, are pitches 1 and 2 respectively. For this description, I more or less followed the description in the guidebook. The route is best done with double ropes as there is one longer rappel on the way down.
| Pitch | Photo | Rating | Description |
| 0.5 | 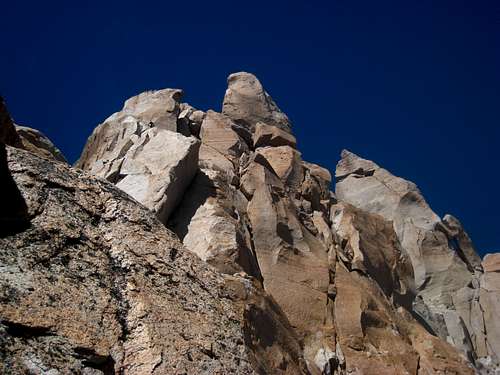 | 5.2 | The approach pitch climbs up easy terrain with lots of features and stances for a full rope length, and ends on a short, flat ridge. A horn can be slung with some webbing for an anchor. I'm sure many parties free solo this pitch, as well as the flake below. Once on the narrow ridge, walk across it for about 20 feet and reach the actual base of the tower where the climbing becomes near vertical. Walk/scramble left on a ledge for 40 feet or so to the left side of the face (towards the northeast side of the tower) and locate an excellent wide hands crack that marks the first pitch of the normal route. This crack is the wider crack just left of the slightly tougher hand crack listed as route 1.1 in the photo below. |
| 1 |  | 5.7 | In the photo to the left, the normal route heads up the crack to the left of the climber at the bottom of the photo. The crack just above him can also be done and is more direct, but slightly more difficult at 5.9 and is labeled in the topo below as route 1.1, with a French rating of a 5. The easier crack just to its left starts out with bomber hand and fist jams and has many features to stand on. Only a few places require a foot jam and higher up it eases with lots of jugs. Pass by a small ledge, and cut slightly right around a corner and mantle up onto the huge ledge where a double bolt and chain anchor is found. Contrary to what the topo below says, I thought this pitch was closer to 40 meters long rather than 30. Walk right, across the huge ledge as it descends a few feet and locate a deep chimney near the right end of the ledge. This is the second pitch and can be tricky to locate but once you realize what it is, it's right in front of you. A piton can be used for a belay anchor if you want. |
| 2 | 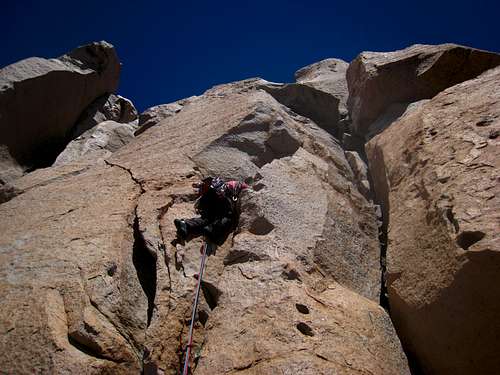 | 5.7 | The second pitch climbs up a flake for 15 feet to the left of the chimney and then traverses right into it. It then climbs the deep chimney with lots of holds. At the top, there is a small roof to climb through but the jugs are huge so it isn't too hard. Do not clip the piton just below the roof that's wedged between the rock and a piece of 2X4. I wish I had a photo of it, as it was the most useless piece of protection I have ever seen! There are many places to put nuts and small to medium sized cams. Just above the roof, there is another set of chains with bolts, but it's easy scrambling for another 50 feet to the notch just to the east of the summit tower. A horn can be slung here for an anchor. |
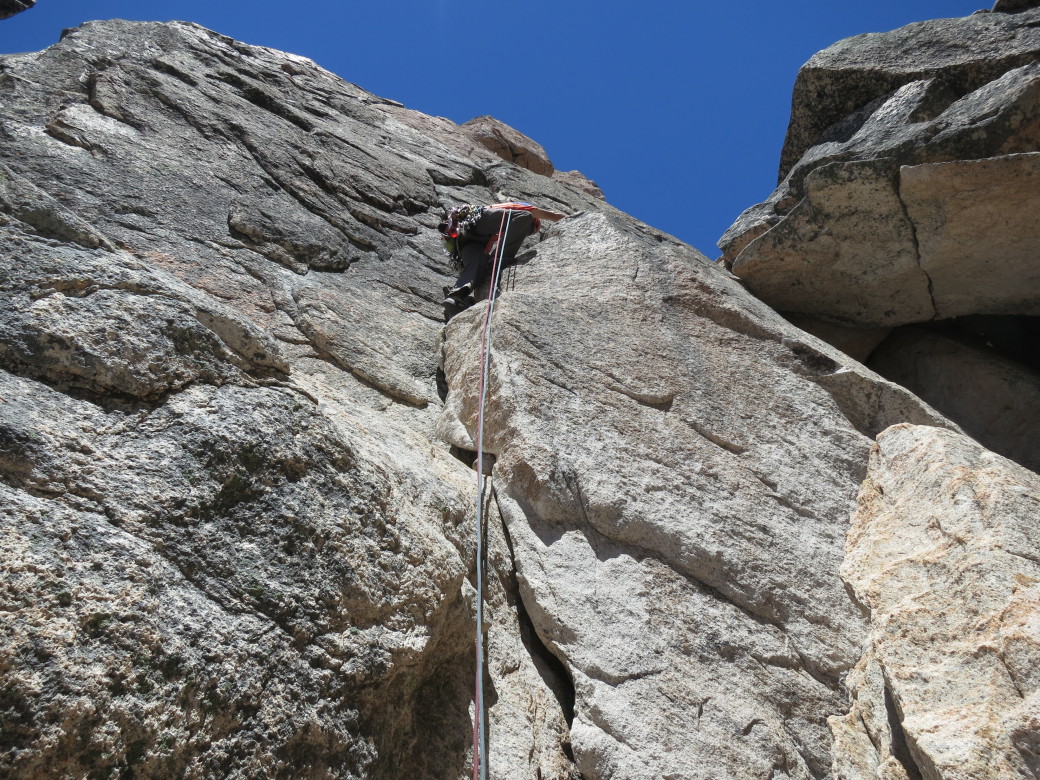
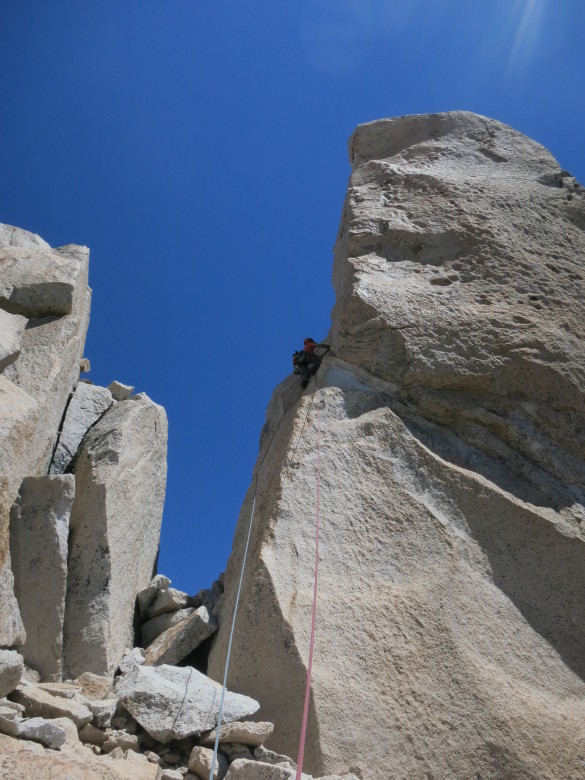
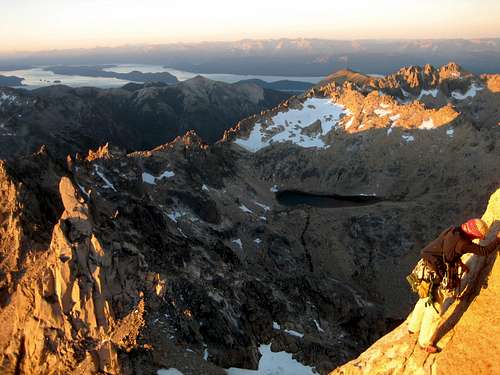
| 3 |  | 5.10a | The final pitch is the crux and climbs the east side of the summit block in a sustained, 30 meter pitch. It is well bolted with around 12 bolts of varying ages but I trusted all of them. There are no need for cams or nuts on this pitch so give them to your follower and keep all your draws. Begin by surmounting a 4 inch ledge 6 feet off the base and continue working your way up the slabs trending left to stay on sub-vertical rock. Another, much harder route climbs straight up to the top but that looked impossible for mortals like myself. The pitch is never pumpy but all the moves require good balance, finger strength and smearing. All the hand holds are small crimps but easy to find. I thought the hardest part was between the last 2 bolts just before reaching the summit area (shown in the photo at left). Once on top, there is a double bolted anchor to set up the belay. Walk a wildly exposed 20 feet back to the right to stand on the tiny summit. Enjoy the incredible views as you are on the highest thing around, with Tronador itself well off to the east being the nearest higher peak. The Town of Bariloche is easily seen to the east and massive lakes, and peaks in all directions surround you. |
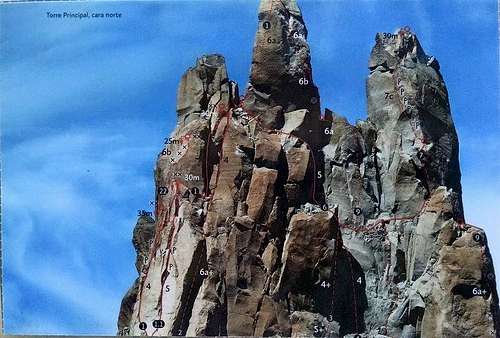
Torre Principal North Face Topo. Normal Route shown as Number 1.
Descent
To descend, locate the second bolt and chain anchor a few inches to the north of the summit and rappel down to the bolted anchor just above the roof on the second pitch, then make another short rappel down the chimney to the huge ledge. Don't rappel directly from the summit to the huge ledge below with your double ropes because the rope will get stuck...trust me it just will, as it happened to us. Walk back up the ledge to the bolts above the first pitch and make a double rope rappel all the way down to the top of the approach pitch. I am not sure if a 70 meter rope will make it, but I didn't think so.
To descend the approach pitch and the 25 foot Class 4 flake next to the cave, scramble down around 50 feet to skiers right of where you ascended and locate a large webbing anchor around a horn and rappel about 30 meters down to the cave pictured above (at the end of the approach section). Then retrace your steps back to the hut and eat some fresh pizza!
 Starting the final pitch | 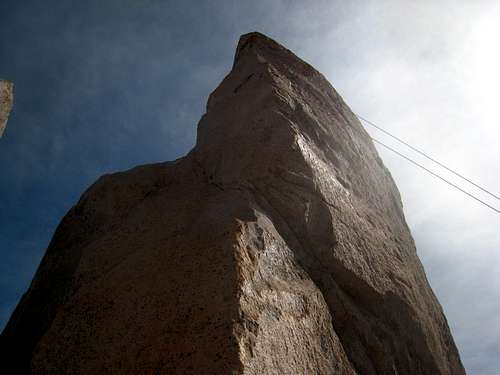 Rapelling the final pitch of Torre Principal  Laguna Frey from Torre Principal | 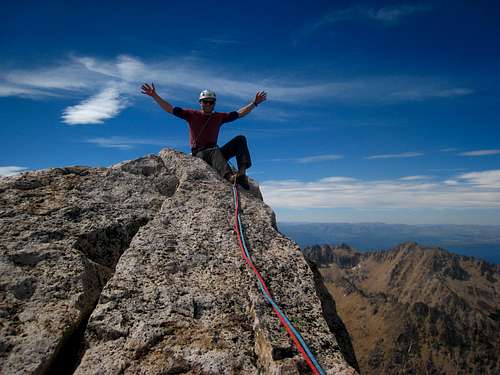 On the summit of Torre Principal 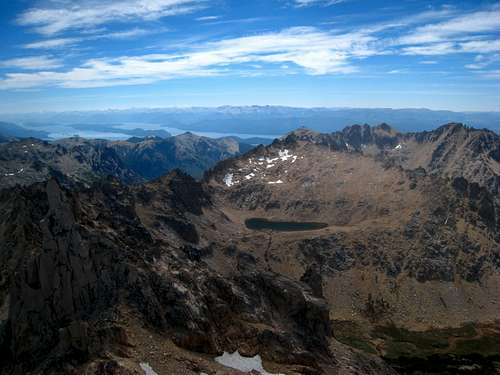 Laguna Schmoll from Torre Principal |
Camping/Red Tape
Plentiful camping can be found around the refugio on the east side of the lake. In the middle of January and February, there can be nearly 100 people in the area so it's important to try your best to keep a clean campsite. There is actual flushing toilets in a covered facility next to the hut and it works amazingly well...just don't ask me where the flushed water goes because I don't know and didn't want to ask. The hut also has beds if you didn't bring a tent or sleeping pad. I believe it's around $10 per night and includes a small breakfast. Pizza, beer, wine and sandwiches can also be purchased at the hut as they have a full stove and fresh food. It's quite amazing really. In the covered area just outside the hut you can cook and eat your own food. Luckily there is no red tape for the entire area.
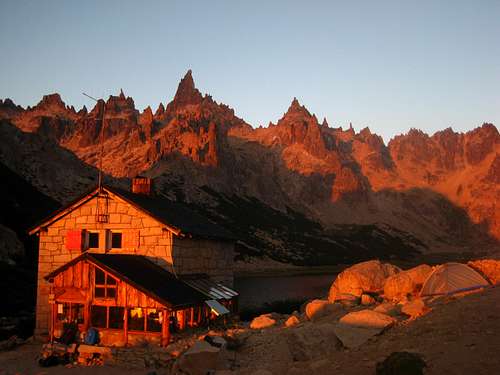
Sunrise on Refugio Frey with Torre Principal behind
When to Climb
The best time to climb is during the Patagonian summer, which is typically November through mid April. This area is considerably drier than the nearby Cochamo Valley just to the west in Chile and sees more sun and warmer temperatures. This is because it lies east of the South American continental divide. January and February are the most popular times but March and April can also be pleasant, with much less people. November and December are also great but lingering snow might make some of the approaches slightly more difficult if you aren't prepared with snow gear such as an ice axe and/or crampons. With the drying climate though, the snow is melting off completely earlier each passing year. In February 2015 there was not a drop of snow to be found and smoke from wildfires occasionally clouded the beautiful scenery. The area is also a very well known ski area and the ski resort nearby is one of the finest in Argentina. People come into the Frey on backcountry ski trips regularly.
 Torre Principal in early spring | 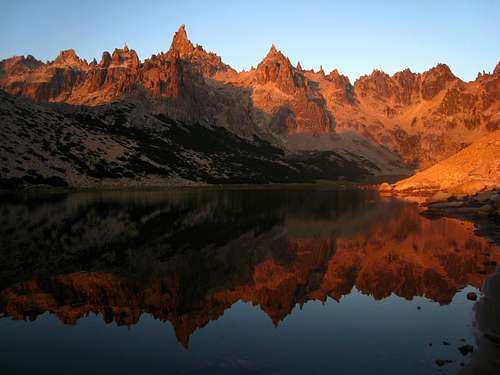 Torre Principal in February |
Map

Aoneker 1:50,000 San Carlos de Bariloche map available from Club Andino in Bariloche. Torre Principal, Refugio Frey and Cerro Catedral ski area are all labeled.
External Links
Torre Principal first rappel
Torre Principal on Patagonia Online Guide